Author : Mayank Sharma, Associate Engineer – CloudDevOps
Introduction
In the age of DevOps and rapid application delivery, ensuring reliable and consistent infrastructure is crucial. Here’s where immutable infrastructure shines. This approach treats servers as immutable entities, deploying new instances with the desired configuration instead of modifying existing ones.
Packer, a powerful tool by HashiCorp, excels at creating these golden images — reusable templates containing the operating system, applications, and configurations for your servers. Let’s delve into how Packer empowers building immutable infrastructure.
What is Packer?
Using a single source configuration, Packer is a community program that generates identical machine images for several platforms. Packer is a lightweight, highly performant operating system-crosser that can create machine images for many platforms at once. Unlike Chef or Puppet, Packer does not take the place of configuration management. In fact, Packer has the ability to add software to images while building them by using tools like Chef or Puppet.
An operating system and installed applications that are already configured are contained in a single static unit called a machine image, which is used to swiftly generate new computers that are operational. Every platform has a different format for machine images. Examples include OVF exports for VirtualBox, VMDK/VMX documents for VMware, and AMIs for EC2.
Why Use Packer?
Pre-baked system images have a number of advantages, however maximum had been not able to gain from them due to the fact image had been too tedious to create and manage. There were either no existing tools to automate the creation of machine images or they had too high of a learning curve. The result is that, prior to Packer, creating machine images threatened the agility of operations teams, and therefore aren’t used, despite the massive benefits.
Packer changes all of this. Packer automates the advent of any kind of machine image. It embraces cutting-edge configuration control with the aid of using encouraging you to apply a framework including Chef or Puppet to put in and configure the software program inside your Packer-made images.
In different words: Packer brings pre-baked images into the present day age, unlocking untapped ability and beginning new opportunities.
Advantages of Using Packer
Super fast infrastructure deployment — Utilizing Packer images enables the launch of fully provisioned and configured machines in a matter of seconds, rather than the typical duration of several minutes or hours. This efficiency significantly benefits both production and development environments. In development, virtual machines can be initiated almost instantaneously, thereby eliminating the extended provisioning times traditionally required.
Multi-provider portability — By creating identical images for multiple platforms, Packer facilitates seamless deployment across various environments. Production can be run on AWS, staging and QA can be managed on a private cloud such as OpenStack, and development can be conducted using desktop virtualization solutions like VMware or VirtualBox. This approach ensures that each environment operates with an identical machine image, providing unparalleled portability and consistency.
Improved stability –Packer installs and configures all the software for a machine at the time the image is built. If there are bugs in these scripts, they’ll be caught early, rather than several minutes after a machine is launched.
Greater testability — After a machine image is built, that machine image can be quickly launched and smoke tested to verify that things appear to be working. If they are, you can be confident that any other machines launched from that image will function properly.
Packer makes it extremely easy to take advantage of all these benefits.
How to Install Packer
Packer is encapsulated within a single binary executable. To create an image with Packer, you can download and install the software through one of the following methods
- Download the Packer binary for macOS, Linux, or Windows
- Install using Homebrew by executing
brew install packer - Install using apt-get by executing
apt-get install packer
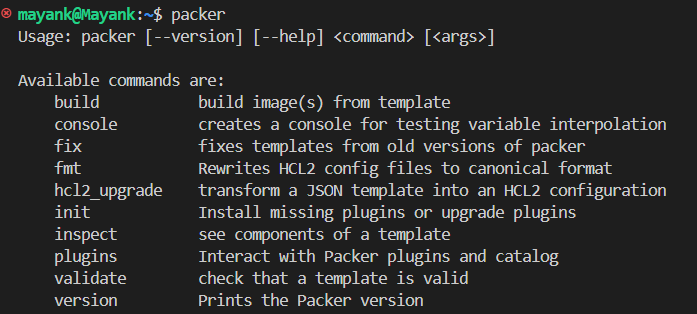
Packer Commands
- packer init: The
packer initcommand initializes a new Packer configuration. It creates a new Packer template with default settings in the current directory. This command is useful when starting a new project or if you want to create a new Packer configuration file from scratch. It ensures that you have a valid configuration file to start with. Example usage: packer init - packer fmt: The
packer fmtcommand formats Packer configuration files according to the standard style conventions. It helps maintain consistency and readability across different configuration files. Runningpacker fmtautomatically adjusts the indentation, spacing, and formatting of the configuration files to match the prescribed style. Example usage: packer fmt example.pkr.hcl - packer validate: The
packer validatecommand checks the syntax and configuration of a Packer template file without actually building an image. It verifies that the configuration file is correctly written and doesn’t contain any syntax errors or invalid settings. This command is useful for detecting issues early in the development process.
Example usage: packer validate example.pkr.hcl - packer build: The
packer buildcommand initiates the image building process based on the specified Packer configuration file. It launches the build process, which involves creating instances, provisioning them, and generating machine images according to the defined configuration. This is the primary command used to create machine images with Packer.
Example usage: packer build example.pkr.hcl
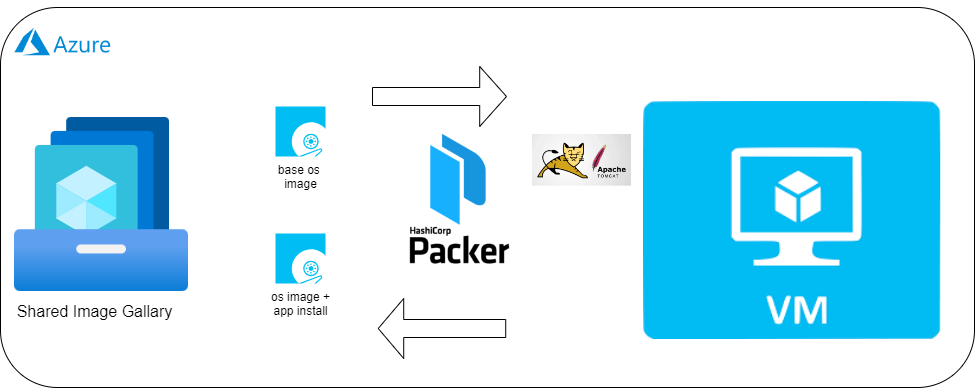
Building Immutable Images with Packer
In this sample usecase, we are creating azure ubuntu image having ngnix application by leveraging packer capabilites.
- Define Configuration: First we need to create the file azure plugins.pkr.hcl where the
packerblock specifies the required plugins. Here, we need theazureplugin.
packer {
  required_plugins {
    azure = {
      source  = "github.com/hashicorp/azure"
      version = "~> 2"
    }
  }
}- Now we need to create the second file azure.pkr.hcl The file starts with a
sourceblock namedazure-arm vm, which defines the Azure ARM virtual machine source for the Packer image.
source azure-arm vm {
  client_id       = var.client_id
  client_secret   = var.client_secret
  subscription_id = var.subscription_id
  tenant_id       = var.tenant_id

  location                          = var.primary_location
  managed_image_name                = "${var.image_name}-${var.image_version}"
  managed_image_resource_group_name = var.gallery_resource_group

  shared_image_gallery_destination {
    subscription        = var.subscription_id
    resource_group      = var.gallery_resource_group
    gallery_name        = var.gallery_name
    image_name          = var.image_name
    image_version       = var.image_version
    replication_regions = [
      var.primary_location,
      "East US"
    ]

  }

  communicator                      = "ssh"
  os_type                           = "Linux"
  image_offer                       = "0001-com-ubuntu-server-focal"
  image_publisher                   = "Canonical"
  image_sku                         = "20_04-lts-gen2"

  vm_size                           = "Standard_DS2_v2"

  allowed_inbound_ip_addresses      = [var.agent_ipaddress]

}- Inside this block, various attributes are set to configure the Azure VM.
client_id,client_secret,subscription_id, andtenant_idare used for authentication and authorization to Azure.locationspecifies the Azure region where the virtual machine will be created.managed_image_nameandmanaged_image_resource_group_namedefine the name and resource group of the managed image that will be created.shared_image_gallery_destinationspecifies the destination for the shared image gallery where the managed image will be stored.communicatoris set to"ssh", indicating that SSH will be used for communication with the VM.os_typespecifies the operating system type of the VM, which is set to"Linux".image_offer,image_publisher, andimage_skuspecify the details of the Azure Marketplace image used for creating the VM.vm_sizedefines the size of the VM.allowed_inbound_ip_addressesspecifies the list of IP addresses allowed to connect to the VM.- Remember to replace placeholders like
var.client_id,var.client_secret,var.subscription_id, andvar.tenant_idwith your actual Azure authentication details. - Now we need to create the third file build.pkr.hcl The file starts with a
buildblock, indicating that you’re defining a build configuration.
build {
  sources = [
    "source.azure-arm.vm"
  ]

  provisioner shell {
    execute_command = local.execute_command
    // inline = ["apt update"]
    script = "bootstrap.sh"
  }

  provisioner shell {
    execute_command = local.execute_command
    inline = ["/usr/sbin/waagent -force -deprovision+user && export HISTSIZE=0 && sync"]
    only = ["azure-arm"]
  }

}- Inside the
buildblock, there’s asourcesattribute, which specifies the source for the build. In this case, it’s"source.azure-arm.vm", indicating that it’s building a virtual machine image for Azure using Azure Resource Manager (ARM). - Following the
sourcesattribute, there are twoprovisionerblocks. Provisioners are used to configure the machine image after it’s been created. - The first
provisionerblock is using theshellprovisioner, which executes shell commands on the machine. It specifies thescriptattribute as"bootstrap.sh",indicating that it will execute thebootstrap.shscript. Where the script will update then it will install the nginx.
sudo apt update
sudo apt install nginx
The execute_command attribute is set to local.execute_command.in local.pkr.hcl we are providing the executable command
locals {
  execute_command = "chmod +x {{ .Path }}; {{ .Vars }} sudo -E sh '{{ .Path }}'"
}- The second
provisionerblock is also using theshellprovisioner, but it’s using theinlineattribute to specify inline shell commands directly within the configuration. These commands seem to deprovision the Azure VM and clear command history post azure image creation. Theonlyattribute restricts this provisioner to run only on the Azure ARM build. - Now we need to Create the variables.pkr.hcl
variable subscription_id {
  type = string
}
variable tenant_id {
  type = string
}
variable client_id {
  type = string
}
variable client_secret {
  type = string
}
variable primary_location {
  type = string
}
variable image_name {
  type = string
}
variable image_version {
  type = string
}
variable gallery_resource_group {
  type = string
}
variable gallery_name {
  type = string
}
variable agent_ipaddress {
  type = string
}- Each
variableblock defines a variable that can be used in Packer configuration files to parameterize values. - The
typeattribute specifies the data type of each variable. In this case, all variables are of typestring, meaning they will accept string values. - By defining these variables separately in a
variables.pkr.hclfile, it allows for better organization and separation of concerns in Packer configuration files. It also enables users to easily customize the configuration by providing values for these variables, making the configuration more flexible and reusable.
Building the Image: Once the configuration is defined, run the packer build command. Packer provisions the machine based on your specifications, Before runing the packer build you need to run the packer init, packer fmt, packer validate and at the final you have to run packer build that will create the azure image and that image will store in the shared image gallery as mention above in step-2.
Conclusion:-
Packer is a valuable tool for building immutable infrastructure. It streamlines the creation of consistent and secure machine images, promoting a reliable and efficient infrastructure management approach. By incorporating Packer into your DevOps workflow, you can ensure a faster, more secure, and more manageable infrastructure for your applications.
References: https://developer.hashicorp.com/packer/docs/


Leave a Reply