Author: Neha Chalia, Associate Engineer – CloudDevOps
Kubernetes, also known as k8s, is an open-source container orchestration platform that automates the deployment, scaling, and management of containerized applications. Amazon EKS is a managed Kubernetes service to run Kubernetes in the AWS cloud and on-premises data centers.
For many applications there may be requirement of persistent storage to persist data even if the process is killed/restarted/stopped or the machine hosting the application itself is stopped. Now, if any such application is hosted on Kubernetes, it doesn’t provide data persistence out of the box which means when a pod is re-created, the data is lost. In Kubernetes, data persistent can be achieved using a Persistent Volume (PV) which is a piece of storage to store data which can be used by pods running in Kubernetes cluster.
As we know AWS provides EBS storage service for data persistence and when using AWS EKS , AWS EBS is the default storage for creating Persistent Volume. But biggest challenge with using EBS as Persistent Volume in Kubernetes Cluster is, it can work in ReadWriteOnce access mode only which means it can be mounted in read-write mode when all the pods are running on single node but if pods are running on multiple nodes, they will not be able to access the data.
In case we have requirement of mounting Persistent Volume on multiple pods running on multiple nodes in read-write mode then in such cases we can’t use AWS EBS as persistent volume in Kubernetes Cluster. For such requirement we can use AWS EFS (Elastic File storage) as Persistent Volume in Kubernetes cluster which works in ReadWriteMany access mode using which can mount Persistent Volume on multiple pods running on multiple nodes in read-write mode
In this blog, I will be explaining how to setup AWS EFS as Persistent Volume in AWS EKS. We will also see the challenge when we use EBS as Persistent Volume in Kubernetes and how that challenge is resolved when we changed to EFS as Persistent Volume.
Before I jump into the setup part, lets revisit some basic concepts of PV, EBS and EFS.
What is Persistent Volume (PV) and why its need in Kubernetes:
Persistent volume basically provides a way to store data that can be used by multiple pods running in different nodes in the cluster, and that data should persist even after the pod or node is deleted. Persistent Volume are useful in scenarios where we need to store data that needs to survive beyond the lifetime of the pod or container that created it.
The need for a persistent volume in Kubernetes arises from the fact that containerized applications are often stateless, meaning that they don’t retain any data when they are restarted or moved to a different node. However, many applications require persistent data storage, such as databases, file systems, or message queues, that must be accessible to multiple pods or containers in a cluster.
EBS (Elastic block storage)
EBS is a service offered by Amazon that stores information for Amazon EC2 Instances. EBS volumes can be attached to EC2 Instances and also to cluster. It is also used as a primary storage device for backups, data archiving and disaster recovery.
Before we jump into setting EFS as a persistent volume in k8s.Let’s start with the setup instructions of EBS.
EFS (Elastic File storage)
EFS (Elastic File storage) is a storage service that can be accessed by multiple pods running in different nodes within the cluster. By using EFS, we can enable persistent storage for stateful applications running on EKS Cluster without having to manage the underlying infrastructure. EFS volumes can be used to store application data that needs to be persist across pod restarts or node failure.
Set up instructions:
Setup EBS as Persistent Volume in AWS EKS
First lets see how EBS works in Kubernetes Cluster.
Pre-requisites:
- Set AWS Identity and Access Management (IAM) permissions for creating and attaching a policy to the Amazon EKS worker node role CSI Driver Role.
- Create your Amazon EKS cluster and join your worker nodes to the cluster
- Have an existing IAM OpenID Connect (OIDC) provider for your cluster. To determine if you already have a cluster, or to create one, see Create an IAM OIDC provider for your cluster
Deploy the Amazon EBS CSI driver
1.Firstly, download an example IAM policy with permissions that allow your worker nodes to create and modify Amazon EBS volumes:
curl -o example-iam-policy.json https://raw.githubusercontent.com/kubernetes-sigs/aws-ebs-csi-driver/v0.9.0/docs/example-iam-policy.json2. Create an IAM policy named Amazon_EBS_CSI_Driver:
aws iam create-policy --policy-name AmazonEKS_EBS_CSI_Driver_Policy --policy-document file://example-iam-policy.json3. View your cluster’s OIDC provider URL:
aws eks describe-cluster --name your_cluster_name --query "cluster.identity.oidc.issuer" --output textNote: In step 3, replace your_cluster_name with your cluster name.
4. Create the following IAM trust policy file:
cat <<EOF > trust-policy.json
{
  "Version": "2012-10-17",
  "Statement": [
    {
      "Effect": "Allow",
      "Principal": {
        "Federated": "arn:aws:iam::YOUR_AWS_ACCOUNT_ID:oidc-provider/oidc.eks.YOUR_AWS_REGION.amazonaws.com/id/<XXXXXXXXXX45D83924220DC4815XXXXX>"
      },
      "Action": "sts:AssumeRoleWithWebIdentity",
      "Condition": {
        "StringEquals": {
          "oidc.eks.YOUR_AWS_REGION.amazonaws.com/id/<XXXXXXXXXX45D83924220DC4815XXXXX>:sub": "system:serviceaccount:kube-system:ebs-csi-controller-sa"
        }
      }
    }
  ]
}
EOF
Note: In step 4, replace YOUR_AWS_ACCOUNT_ID with your account ID. Replace YOUR_AWS_REGION with your AWS Region. Replace XXXXXXXXXX45D83924220DC4815XXXXX with the value returned in step 3
5. Create an IAM role:
aws iam create-role \
  --role-name AmazonEKS_EBS_CSI_DriverRole \
  --assume-role-policy-document file://"trust-policy.json"
6. Attach your new IAM policy to the role:
aws iam attach-role-policy \
--policy-arn arn:aws:iam::<AWS_ACCOUNT_ID>:policy/AmazonEKS_EBS_CSI_Driver_Policy \
--role-name AmazonEKS_EBS_CSI_DriverRoleNote: The policy ARN can be found in the output from step 2 above.
7. To deploy the Amazon EBS CSI driver, run one of the following commands based on your Region:
All Regions other than China Regions:
kubectl apply -k "github.com/kubernetes-sigs/aws-ebs-csi-driver/deploy/kubernetes/overlays/stable/?ref=master"Beijing and Ningxia China Regions:
kubectl apply -k "github.com/kubernetes-sigs/aws-ebs-csi-driver/deploy/kubernetes/overlays/stable-cn/?ref=master"8. Annotate the ebs-csi-controller-sa Kubernetes service account with the Amazon Resource Name (ARN) of the IAM role that you created earlier:
kubectl annotate serviceaccount ebs-csi-controller-sa \
  -n kube-system \
  eks.amazonaws.com/role-arn=arn:aws:iam::YOUR_AWS_ACCOUNT_ID:role/AmazonEKS_EBS_CSI_DriverRole
Note: Replace YOUR_AWS_ACCOUNT_ID with your account ID.
9. Delete the driver pods:
kubectl delete pods \
  -n kube-system \
  -l=app=ebs-csi-controller
Test the Amazon EBS CSI driver:
You can test your Amazon EBS CSI driver with an application that uses dynamic provisioning. The Amazon EBS volume is provisioned on demand.
- Clone the aws-ebs-csi-driver repository from AWS GitHub:
git clone https://github.com/kubernetes-sigs/aws-ebs-csi-driver.git2. Change your working directory to the folder that contains the Amazon EBS driver test files:
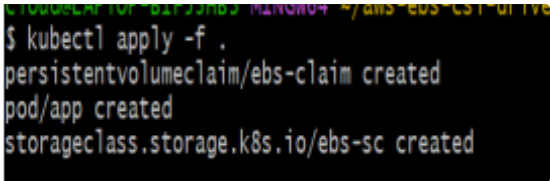
cd aws-ebs-csi-driver/examples/kubernetes/dynamic-provisioning/3. Create the Kubernetes resources required for testing:
kubectl apply -f manifests/By this we will get one pod.yaml , storageclass.yaml and claim.yaml file and from this execution a storage class, persistent volume claim(PVC) and a pod will get create. In pod.yaml file a persistent volume claim(PVC) is referenced and EBS volume is provisioned only when the pod is created.
4.Describe the ebs-sc storage class:
kubectl describe storageclass ebs-sc5. Watch the pods in the default namespace and wait for the app pod’s status to change to Running. For example:
kubectl get pods --watch6. View the persistent volume created because of the pod that references the PVC:
kubectl get pv
7. View information about the persistent volume:
kubectl describe pv your_pv_nameNote: Replace your_pv_name with the name of the persistent volume returned from the preceding step 6. The value of the Source.VolumeHandle property in the output is the ID of the physical Amazon EBS volume created in your account.
8. Verify that the pod is writing data to the volume:
kubectl exec -it app -- cat /data/out.txt
Note: The command output displays the current date and time stored in the /data/out.txt file. The file includes the day, month, date, and time.
Testing of EBS
Now lets test our setup and see how the Persistent Volume works when using EBS as Storage.
Case1: If two pods are running on a single node with “ReadWriteOnce” access mode, then both of the pods can access the their data.
kubectl exec -it app1 /bin/bash
kubectl exec -it app2 /bin/bash
Case2 — If we try to create Persistent Volume with “ReadWriteMany” access mode then PV creation will fail.

Case3: If I take two pods running in different nodes with access mode “ReadWriteOnce” then both of the pods cannot access their data..at a time only one pod can Read Write and other one can ReadOnly.
Result:
kubectl exec -it app1 /bin/bash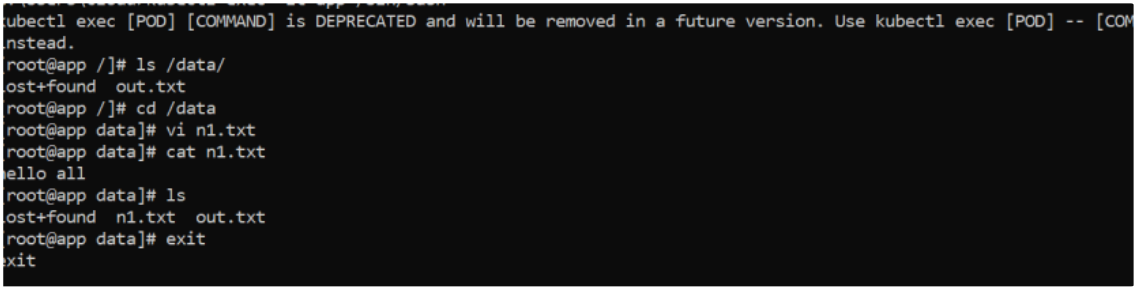
kubectl exec -it app2 /bin/bash
As we can see above, we cannot mount EBS as persistent volume in AWS EKS with multiple pods running in different nodes.
Setting up EFS as Persistent Volume in AWS EKS
Before deploying the CSI driver, create an IAM role that allows the CSI driver’s service account to make calls to AWS APIs on your behalf.
- Download the IAM policy document from GitHub:
curl -o iam-policy-example.json https://raw.githubusercontent.com/kubernetes-sigs/aws-efs-csi-driver/v1.2.0/docs/iam-policy-example.json2. Create an IAM policy:
aws iam create-policy \
    --policy-name AmazonEKS_EFS_CSI_Driver_Policy \
    --policy-document file://iam-policy-example.json
3. Annotate the Kubernetes service account with the IAM role ARN and the IAM role with the Kubernetes service account name. For example:
aws eks describe-cluster --name your_cluster_name --query "cluster.identity.oidc.issuer" --output textNote: In step 3, replace your_cluster_name with your cluster name.
4. Create the following IAM trust policy, and then grant the AssumeRoleWithWebIdentity action to your Kubernetes service account. For example:
cat <<EOF > trust-policy.json
{
  "Version": "2012-10-17",
  "Statement": [
    {
      "Effect": "Allow",
      "Principal": {
        "Federated": "arn:aws:iam::YOUR_AWS_ACCOUNT_ID:oidc-provider/oidc.eks.YOUR_AWS_REGION.amazonaws.com/id/<XXXXXXXXXX45D83924220DC4815XXXXX>"
      },
      "Action": "sts:AssumeRoleWithWebIdentity",
      "Condition": {
        "StringEquals": {
          "oidc.eks.YOUR_AWS_REGION.amazonaws.com/id/<XXXXXXXXXX45D83924220DC4815XXXXX>:sub": "system:serviceaccount:kube-system:efs-csi-controller-sa"
        }
      }
    }
  ]
}
EOF
Note: In step 4, replace YOUR_AWS_ACCOUNT_ID with your account ID. Replace YOUR_AWS_REGION with your Region. Replace XXXXXXXXXX45D83924220DC4815XXXXX with the value returned in step 3.
5. Create an IAM role
aws iam create-role \
  --role-name AmazonEKS_EFS_CSI_DriverRole \
  --assume-role-policy-document file://"trust-policy.json"
6. Attach your new IAM policy to the role.
aws iam attach-role-policy \
  --policy-arn arn:aws:iam::<AWS_ACCOUNT_ID>:policy/AmazonEKS_EFS_CSI_Driver_Policy \
  --role-name AmazonEKS_EFS_CSI_DriverRole
7. Install the driver using images stored in the public Amazon ECR registry by downloading the manifest:
kubectl kustomize "github.com/kubernetes-sigs/aws-efs-csi-driver/deploy/kubernetes/overlays/stable/?ref=release-1.3" > public-ecr-driver.yaml8. Edit the file ‘public-ecr-driver.yaml’ and annotate ‘efs-csi-controller-sa’ Kubernetes service account section with the ARN of the IAM role that you created:
apiVersion: v1
kind: ServiceAccount
metadata:
  labels:
    app.kubernetes.io/name: aws-efs-csi-driver
  annotations:
    eks.amazonaws.com/role-arn: arn:aws:iam::<accountid>:role/AmazonEKS_EFS_CSI_DriverRole
  name: efs-csi-controller-sa
  namespace: kube-system
Deploy the Amazon EFS CSI driver:
The Amazon EFS CSI driver allows multiple pods to write to a volume at the same time with the ReadWriteMany mode.
- To deploy the Amazon EFS CSI driver, apply the manifest:
kubectl apply -f public-ecr-driver.yaml2. If your cluster contains only AWS Fargate pods (no nodes), then deploy the driver with the following command (all Regions):
kubectl apply -f https://raw.githubusercontent.com/kubernetes-sigs/aws-efs-csi-driver/master/deploy/kubernetes/base/csidriver.yaml3. Get the VPC ID for your Amazon EKS cluster:
aws eks describe-cluster --name your_cluster_name --query "cluster.resourcesVpcConfig.vpcId" --output textNote: In step 3, replace your_cluster_name with your cluster name.
4. Get the CIDR range for your VPC cluster:
aws ec2 describe-vpcs --vpc-ids YOUR_VPC_ID --query "Vpcs[].CidrBlock" --output textNote: In step 4, replace the YOUR_VPC_ID with the VPC ID from the preceding step 3.
5. Create a security group that allows inbound network file system (NFS) traffic for your Amazon EFS mount points:
aws ec2 create-security-group --description efs-test-sg --group-name efs-sg --vpc-id YOUR_VPC_IDNote: Replace YOUR_VPC_ID with the output from the preceding step 3. Save the GroupId for later.
6. Add an NFS inbound rule so that resources in your VPC can communicate with your Amazon EFS file system:
aws ec2 authorize-security-group-ingress --group-id sg-xxx --protocol tcp --port 2049 --cidr YOUR_VPC_CIDRNote: Replace YOUR_VPC_CIDR with the output from the preceding step 4. Replace sg-xxx with the security group ID from the preceding step 5.
7. Create an Amazon EFS file system for your Amazon EKS cluster:
aws efs create-file-system --creation-token eks-efsNote: Save the FileSystemId for later use.
8. To create a mount target for Amazon EFS, run the following command:
aws efs create-mount-target --file-system-id FileSystemId --subnet-id SubnetID --security-group sg-xxxImportant: Be sure to run the command for all the Availability Zones with the SubnetID in the Availability Zone where your worker nodes are running. Replace FileSystemId with the output of the preceding step 7 (where you created the Amazon EFS file system). Replace sg-xxx with the output of the preceding step 5 (where you created the security group). Replace SubnetID with the subnet used by your worker nodes. To create mount targets in multiple subnets, you must run the command in step 8 separately for each subnet ID. It’s a best practice to create a mount target in each Availability Zone where your worker nodes are running.
Note: You can create mount targets for all the Availability Zones where worker nodes are launched. Then, all the Amazon Elastic Compute Cloud (Amazon EC2) instances in the Availability Zone with the mount target can use the file system.
The Amazon EFS file system and its mount targets are now running and ready to be used by pods in the cluster.
Test the Amazon EFS CSI driver:
You can test the Amazon EFS CSI driver by deploying two pods that write to the same file.
- Clone the aws-efs-csi-driver repository from AWS GitHub:
git clone https://github.com/kubernetes-sigs/aws-efs-csi-driver.git2. Change your working directory to the folder that contains the Amazon EFS CSI driver test files:
cd aws-efs-csi-driver/examples/kubernetes/multiple_pods/3. Retrieve your Amazon EFS file system ID that was created earlier:
aws efs describe-file-systems --query "FileSystems[*].FileSystemId" --output textNote: If the command in step 3 returns more than one result, you can use the Amazon EFS file system ID that you saved earlier.
4. In the specs/pv.yaml file, replace the spec.csi.volumeHandle value with your Amazon EFS FileSystemId from previous steps.
5. Create the Kubernetes resources required for testing:
kubectl apply -f specs/Note: The kubectl command in the preceding step 5 creates an Amazon EFS storage class, PVC, persistent volume, and two pods (app1 and app2).
6 . List the persistent volumes in the default namespace, and look for a persistent volume with the
default/efs-claim claim:
kubectl get pv -w7. Describe the persistent volume:
kubectl describe pv efs-pv8. Test if the two pods are writing data to the file:
kubectl exec -it app1 -- tail /data/out1.txt
kubectl exec -it app2 -- tail /data/out1.txt
Testing of EFS
If I take 2 pods with access mode”ReadWriteMany”,and both of them running in different nodes and If I have created file in pod1 running in e.g textfile1.txt,textfile2.txt and then it should also be reflected in pod2 and vice versa and If I will write some content in any file e.g textfile1.txt and I insert something like for e.g hello…validated for efs..then all the contents will also show to me when I accessed it from pod2 ..
Result:
kubectl exec -it app3 /bin/bash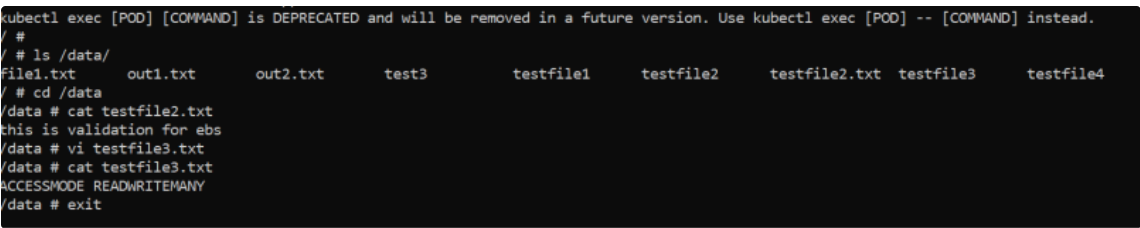
kubectl exec -it app4 /bin/bash
As we can see that we can successfully mount persistent volume in EFS in ReadWriteMany access mode which works with multiple pods running in different nodes as EBS does not work in this scenario. So, in the case of stateful application that requires ReadWriteMany mode, EFS should be the preferred choice over EBS.
Some of the specific use cases/benefits of using EFS in Kubernetes Cluster
- Cross-AZ Redundancy: Since all data written to EFS is available to multiple AWS availability zones, it can help to make Kubernetes applications scalable and highly available. Scaled pods can share the same data in case of dependency on the same data across pods.
- Content management system and web server support: EFS is a robust throughput file system capable of enabling content management systems and web serving applications, such as archives, websites, or blogs.
- Dynamic Scaling: It is better to choose EFS when it is difficult to estimate the amount of storage the application will use because EFS is built to elastically scale.
Leave a Reply