Author: Kalyanee Mehare, Associate Engineer – CloudDevOps; Ipshita Chaudhary, Associate Engineer – CloudDevOps; Rajat Sharma, Associate Engineer -CloudDevOps
Problem Statement
The adoption of cloud-native development practices, particularly with Kubernetes, is rapidly accelerating as companies shift from monolithic tech to the more reliable, scalable and portable environment that the cloud provides.
Some of the features that make Kubernetes a powerful application deployment environment can also create new challenges when it comes to managing and protecting your data. Implementing backup for your applications running on Kubernetes is critical to protect your data in the event of an accident, system failure or even a deliberate attack.
In addition, Kubernetes environments are often dynamic, with applications and data constantly changing. This means that backups need to be kept up to date in order to restore data in the event of any disaster recovery, data loss or any deliberate attack. The biggest challenge is, Kubernetes does not have any built-in backup and restore solution
Solution
Velero can address the challenge of backup of restore solution for Kubernetes. It can safely backup and restore, perform disaster recovery, and migrate Kubernetes cluster resources and persistent volumes.
Before we move into setup, let us look at some more details around Velero tool and its features.
What is Velero?
Velero is an open source tool to safely backup and restore, perform disaster recovery, and migrate Kubernetes cluster resources and persistent volumes. It works both on premises and in a public cloud. Velero consists of a server process running as a deployment in your Kubernetes cluster and a command-line interface (CLI) with which teams can configure scheduled backups, trigger ad-hoc backups, perform restores, and more.
Key Features
- Selective Backups — Backup your Kubernetes resources and volumes for an entire cluster, or part of a cluster by using namespaces or label selectors.
- Schedule Backups — Set schedules to automatically kickoff backups at recurring intervals.
- Backup Hooks — Configure pre and post-backup hooks to perform custom operations before and after Velero backups.
What Makes Velero Stand Out?
Unlike other tools which directly access the Kubernetes etcd database to perform backups and restores, Velero uses the Kubernetes API to capture the state of cluster resources and to restore them when necessary. This API-driven approach has a number of key benefits:
- Backups can capture subsets of the cluster’s resources, filtering by namespace, resource type, and/or label selector, providing a high degree of flexibility around what’s backed up and restored.
- Users of managed Kubernetes offerings often do not have access to the underlying etcd database, so direct backups/restores of it are not possible.
- Resources exposed through aggregated API servers can easily be backed up and restored even if they’re stored in a separate etcd database.
Additionally, Velero enables you to backup and restore your applications’ persistent data alongside their configurations, using either your storage platform’s native snapshot capability or an integrated file-level backup tool called restic.
How Velero Works?
Each Velero operation like on-demand backup, scheduled backup, restore etc is a custom resource defined with a Kubernetes Custom Resource Definition (CRD) and stored in etcd. Velero also includes controllers that process the custom resources to perform backups, restores, and all related operations. Lets understand how Velero backup and restore works in a Kubernetes Cluster
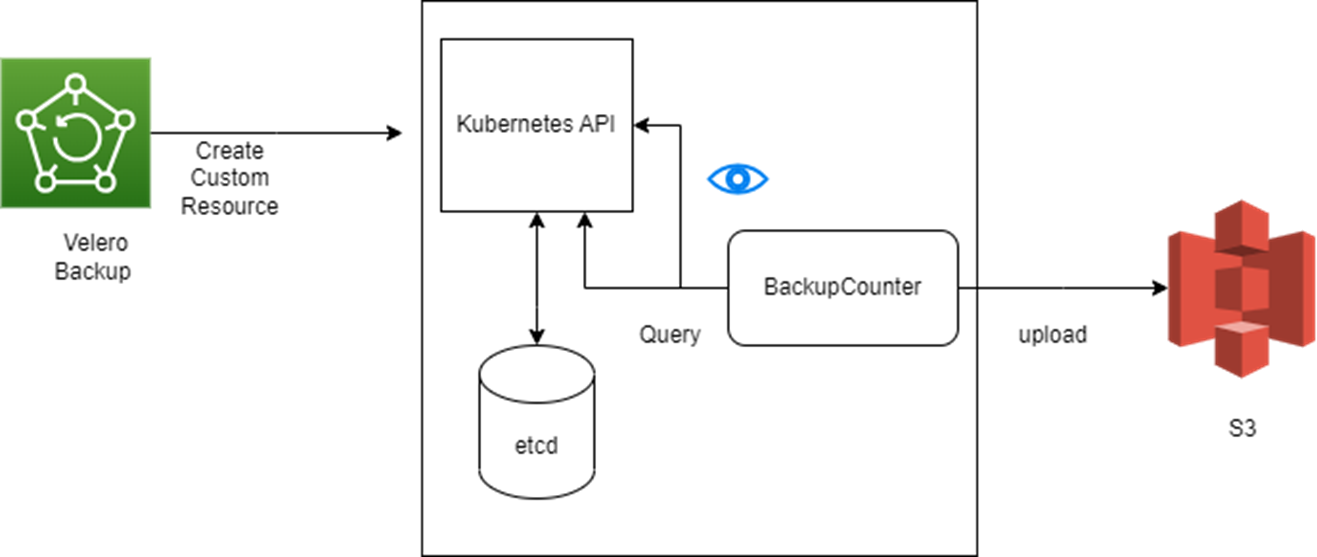
Backup Workflow
When you run velero backup create a backup lets say ct-test-backup
- The Velero client makes a call to the Kubernetes API server to create a Backup object.
- The BackupController notices the new Backup object and performs validation.
- The BackupController begins the backup process. It collects the data to back up by querying the API server for resources.
- The BackupController makes a call to the object storage service . For example, AWS S3 to upload the backup file.
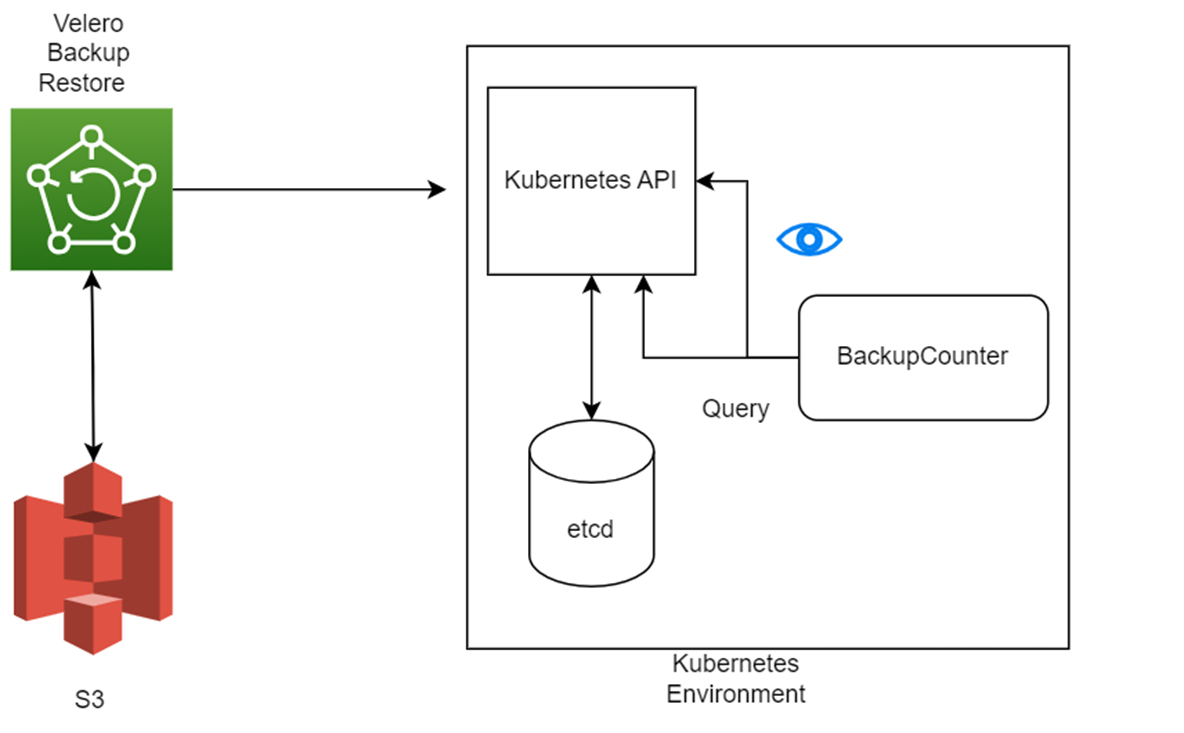
Restore Workflow
When you run velero restore create to take restore a backup
- The Velero client makes a call to the Kubernetes API server to create a
Restoreobject. - The
RestoreControllernotices the new Restore object and performs validation. - The
RestoreControllerfetches the backup information from the object storage service. It then runs some preprocessing on the backed up resources to make sure the resources will work on the new cluster. For example, using the backed-up API versions to verify that the restore resource will work on the target cluster. - The
RestoreControllerstarts the restore process, restoring each eligible resource one at a time.
By default, Velero performs a non-destructive restore, meaning that it won’t delete any data on the target cluster. If a resource in the backup already exists in the target cluster, Velero will skip that resource.
Setup and Usage of the Velero
Pre-requisites
- Kubernetes Cluster version 1.7 or later
- Storage Service to store the backup files for e.g. in our case since we will be using AWS Managed EKS Cluster, we will be using S3 bucket as storage service
- Velero Client. For compatibility of Velero with Kubernetes Cluster version please refer here
- GitHub — vmware-tanzu/velero: Backup and migrate Kubernetes applications and their persistent volumes
Setup Instructions
Velero Installation
- Install AWS CLI

2. Configure your AWS account credentials
aws configure
3. Create S3 bucket for storing the backup files
aws s3api create-bucket --bucket velero-demo-backup --create-bucket-configuration LocationConstraint=us-west-1

4. Create an EKS Cluster (change variables as per your environment)
eksctl create cluster --name velero-pc --node-type t3.medium --nodes 1 --nodes-min 1 --nodes-max 2 --region us-west-1 --version 1.23 --vpc-public-subnets subnet-0a08f173657a8ec41,subnet-05d0b5c42030da419
5. Install Velero CLI (Refer link https://github.com/vmware-tanzu/velero/releases/tag/v1.12.1 to download appropriate version as per OS)
wget https://github.com/vmware-tanzu/velero/releases/download/v1.12.1/velero-v1.12.1-linux-amd64.tar.gz tar -xvf velero-v1.12.1-linux-amd64.tar.gz sudo mv velero-v1.12.1-linux-amd64/velero /usr/local/bin/
6. Connect to Kubernetes Cluster we created in Step-5
aws eks update-kubeconfig --name velero-pc --region us-west-1
7. Install Velero on Kubernetes Cluster with backup location as S3 bucket we created in step-3
velero install --provider aws --plugins velero/velero-plugin-for-aws:v1.0.1 --bucket velero-demo-backup
8. Verify Velero Installation
kubectl get ns kubectl get pods --all-namespaces
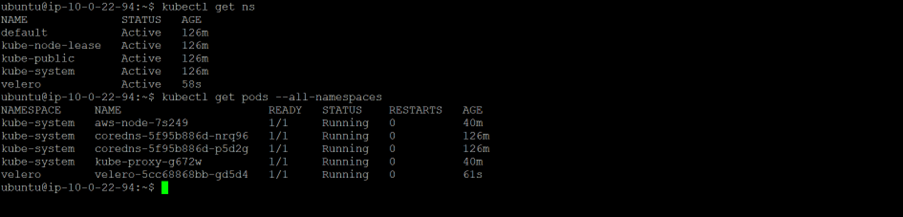
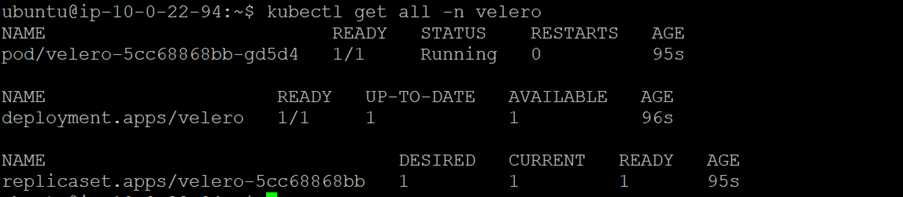
9. Verifying all pods are running properly.
kubectl get all -n velero
Deploy Sample Apps
Now that we have successfully installed Velero on our Kubernetes Cluster. Now lets deploy some sample applications where we will test Backup and Restoration process.
- Create a dedicated namespace for sample applications
kubectl create namespace eks-backup-demo
2. Deploy two sample applications in the namespace we have created
kubectl create deployment web --image=gcr.io/google-samples/hello-app:1.0 -n eks-backup-demo kubectl create deployment nginx --image=nginx -n eks-backup-demo
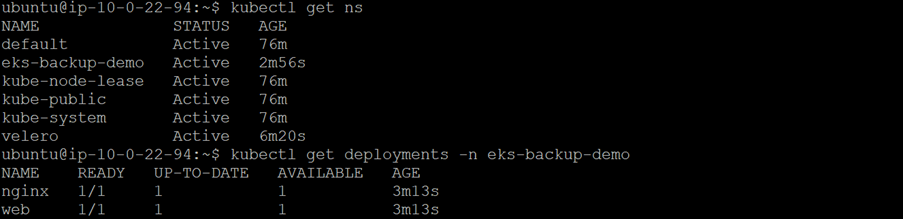
3. Verify Deployment
kubectl get deployments -n eks-backup-demo

Backup
Now we have deployed sample applications.. Lets start taking the backup of both applications using Velero
- Create Backup
velero backup create <backupname> --include-namespaces <namespacename> velero backup create eks-backup --include-namespaces eks-backup-demo

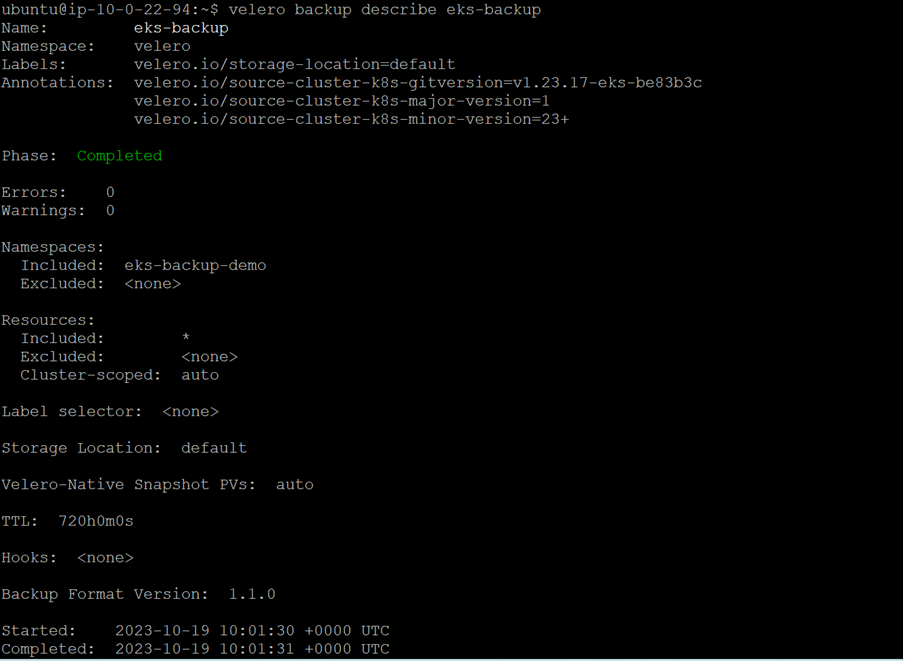
2. Describe Backup
velero backup describe eks-backup
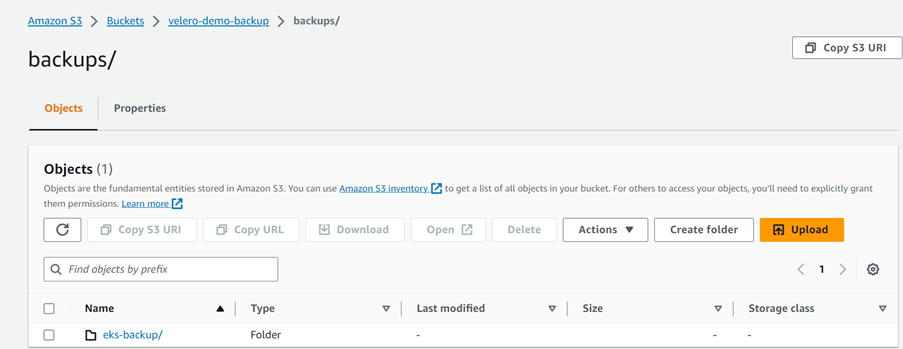
3. Verify the Backup files in S3 bucket. When Backup is success, it creates a folder in S3 bucket with the name of backup you created in Step-1 and inside that backup files will be stored in the form of Json files

4. We can also schedule the Velero Backups using the below command
velero schedule create firstsche --schedule="*/5 * * * *" --include-namespaces eks-backup-demo --ttl 0h15m0s
The above command will take backup of eks-backup-demo namespace every 5 minutes with ttl of 15 minutes to keep last backups of 15 minutes only.
Restoration
Now we have taken the backup of all Kubernetes resources inside eks-backup-demo namespace, lets first delete our resources manually from Kubernetes cluster and then perform restoration using the backup we created above
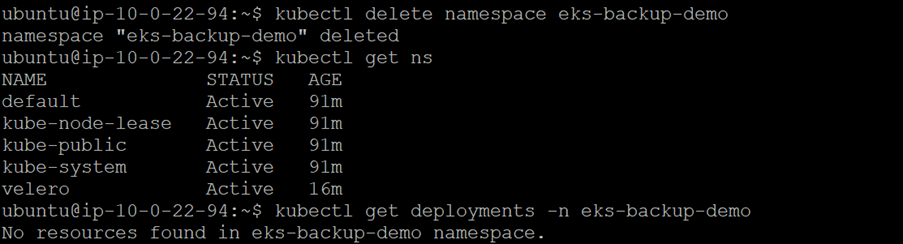
- Delete Namespace and verify the namespace and all resources inside namespace have been deleted successfully
kubectl delete ns eks-backup-demo kubectl get ns kubectl get deployments -n eks-backup-demo
2. Perform restoration
velero restore create eks-restore --from-backup eks-backup
3. Validate Backup has been restored successfully
kubectl get ns kubectl get deployments -n eks-backup-demo
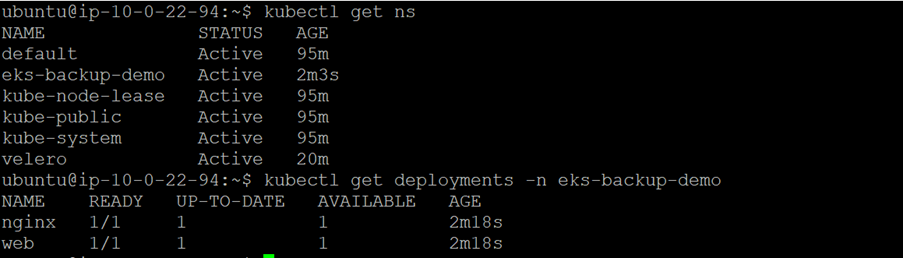
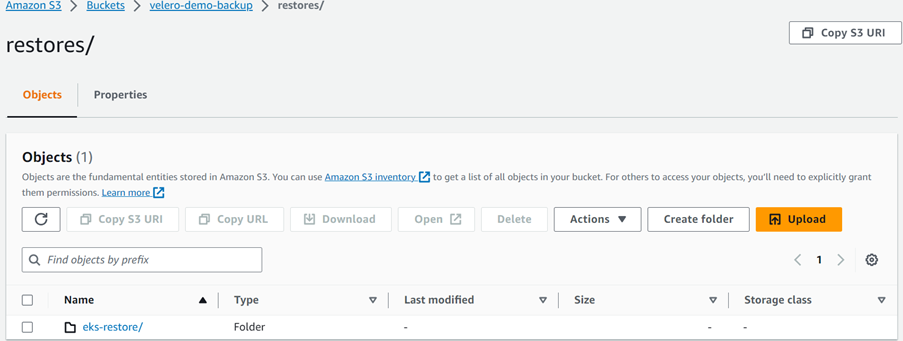
4. When you perform the Velero restoration, similar to backup, it creates a folder inside S3 bucket with the name of restoration we given above , where restoration results and logs are stored

Restoration to different cluster
Similar to the restoration in same cluster we can restore the same backup in different cluster.
- Create a new EKS Cluster
eksctl create cluster --name demo-velero --node-type t3.medium --nodes 1 --nodes-min 1 --nodes-max 2 --region us-west-1 --version 1.23
2. Connect to new EKS Cluster
aws eks update-kubeconfig --name demo-velero --region us-west-1 kubectl get ns

3. Install Velero in new cluster pointing to the same S3 bucket we created above
velero install --provider aws --plugins velero/velero-plugin-for-aws:v1.0.1 --bucket velero-demo-backup --backup-location-config region=us-west-1 --snapshot-location-config region=us-west-1 --secret-file /home/ubuntu/.aws/credentials
4. Perform a restore from existing cluster backup
velero restore create backup-restore --from-backup eks-backup
5. Validate backup has been restored successfully
kubectl get ns kubectl get deployments -n eks-backup-demo
If Kubernetes is all about YAML, do we really need to care about backups of Kubernetes Clusters?
In Kubernetes cluster every resource/object is is created using YAML files but YAML files have some limitations
- Loss of Etcd State: An essential part of your cluster, the Etcd state, cannot be recovered using YAMLs.
- YAMLs Might Not Be Up to Date: In the event of a disaster, your YAMLs might not reflect the most current cluster status.
- Persistent Volume Data: Persistent Volume data is not captured by Kubernetes YAMLs.
- Backup Status: You may need to backup sensitive information, certificates, and configuration data kept in Secrets, Certificates, and ConfigMaps. Backup using YAMLs is limited.
Conclusion
Velero is a greate tool for backing up Kubernetes clusters. It compresses and stores backups of Kubernetes objects to object storage, taking snapshots of Persistent Volumes on your cloud provider’s block storage and then restoring clusters and Persistent Volumes to their previous states during disaster recover.
Here is a link to an in-depth webinar on this topic. Happy viewing!
Velero Webinar — https://www.youtube.com/watch?v=2xI7anQG_l8


Leave a Reply